Fun Christmas using the Accuquilt Go Cutter.

I received the Accuquilt GO for Christmas last year and it is one of my favorite tools. I would dread cutting fabric shapes and I was constantly messing up. My hand would slip, the ruler moved, and I ended up with lop-sided shapes. Or, I would miscalculate my measurements. When I used my Accuquilt for the first time, it was like, “Where have you been all my life!” I may have actually heard a little “Hallelujah” in the background. I couldn’t believe how fast and easy it was! Before, I would have to really focus in on my cutting, making sure every line was matched up and realign after every cut. It took up half my project time! Now, I just place my fabric on the cutter and feed it through while catching up on my TV. shows. Heaven!
This is a must-have tool for quilters, but it is not limited to quilting. You can use the templates to speed up any project. Used the circle die to sew perfect polka dots on a skirt. Use an appliqué die to quickly add flare to a pillow or jacket. The possibilities are endless! The following is a project completed using the basic square die that came with my cutter. It’s fun and has a variety of different uses. Now, go forth and create!
What you're going to need:
1. Scrap fabric
2. Batting or stabilizer
4. Accuquilt square die (come with machine)
5. Needle
6. Metallic thread (Optional, refer to Metallic Thread Tips for additional help)
7. Metallic Needle (if you are using metallic thread)
8. Embroidery Thread (optional, gives a little extra umph)
9. Scissors
10. Ribbon
11. Accuquilt Go Cutter
12.Sewing Machine
Your Accuquilt comes with an instructional DVD, but here is the gist. Open it up on a flat surface. Fold your fabric onto the shape you intend to use. I found 8 layers is the ideal thickness.

Place the cutting mat on top of the fabric and slide it through while cranking the handle. Inserting the die at a slight angle is most efficient. Work those arm muscles!

Repeat for desired amount. Take out batting or stabilizer and coat with basting spray. Lay squares onto batting, making sure they are secure.

Set your machine to a zigzag stitch with the length at about 0.9. This is going to make a nice border and prevent fraying. Slowly feed the edge of the square through, ensuring the stitches are close together. When you get to the corner, keep your needle down, lift the foot, and rotate your fabric 90 degrees and continue sewing.

Repeat on all squares.
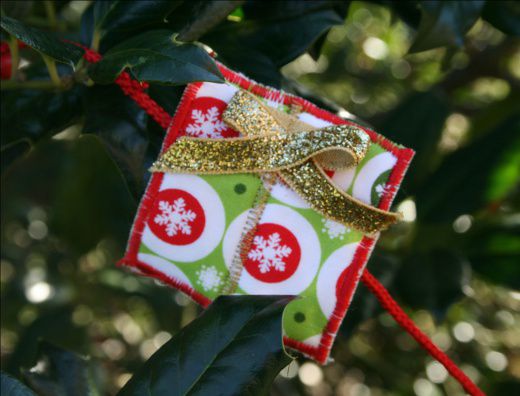
Replace the embroidery thread with metallic thread and insert metallic needle. Using the same zigzag stitch, sew a line down and across the middle just like ribbon on a present. TIP: I suggest checking out the Metallic Thread Tips. You can also switch back to embroidery thread, if you like. I ended up using both.


