
Making your own clothes from scratch is incredibly time consuming. And after the cost of notions and fabric, it doesn’t always save enough money to justify the time spent. But if you still want your clothes to stand out and be one-of-a-kind, embellishments can fill the void. You can find clothing at thrift stores or on sale and alter them to fit your taste. All the time you save on construction can be put into creating a detailed embellishment that is sure to turn a few heads.
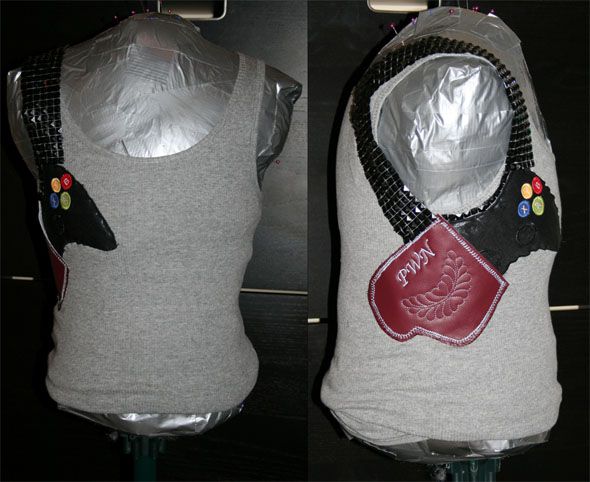
I decided to bring out my inner geek and create an ode to all the video gamers out there. The gun holster is a functional pocket and actually holds a cell phone quite well. For this project, it is best to work with a body form, however if you don’t have one, check out the Duct Tape Body Form post to make your own. When designing your own embellishment, love thy Google. If your drawing skills are limited to stick figures, like me, search Google images to find what you like. Print it out and trace on to tracing paper, freezer paper or newspaper and you have yourself a pattern.
I find that embellishments look better when they are detailed. Little details like using batting to add depth or mixing fabric textures make for a more visually interesting end product. This is a great time to experiment with stitches, fabric, and trims you otherwise may never use.
Required Supplies
1. Tank top
2. Dress Form (Homemade Dress Form Tutorial)
3. Fabric scraps
4. Trim
5. Batting
8. Even Feed Foot
9. Monogram Foot
10. Winged needle
11. Scissors
12. Tracing Paper
13. Tracing Pencil
14. Thread
15. Pattern weights *Tip: If you don’t have any pattern weights, small food cans work well.
Trace and cut out your pattern.

Embroider your fabric before you cut. Use Quilt batting as a stabilizer.
If you don’t have an embroidery machine, you could use acrylic paint to add the small details, like the A B X Y letters.
Once you have all your fabric pieces embroidered and cut out, appliqué the pieces together using a zigzag stitch. An Even Feed Pressure foot or Walking Foot will reduce puckering and fabric distortion.

I wanted the gun holster to have an embossed leather look with a slightly western vibe. You can use acrylic paint on the faux leather, too. You can add more or less design or even add beads and sequence. A topstitch needle embroiders on this kind of vinyl material really well. No need to buy a leather needle.

Use your dress form to position your design on the tank top. The dress form is going to ensure the design sits right on the tank top. Hand baste in place.

Zigzag stitch embellishment onto tank top. You will need to slightly stretch the tank top to lay flat with your embellishment piece while sewing.
Repeat with any other embellishment pieces you are adding.

If you are doing a gun holster, make sure to leave an opening for the pocket. Instead of machine stitching the holster, I used a simple whip stitch to give another leather-like detail.

All that’s left is to add the straps. Grab your trim and pin it in place on the dress form. Hand stitch on the tank top using matching thread.
All Finished! Feel free to share your own embellishment designs!


