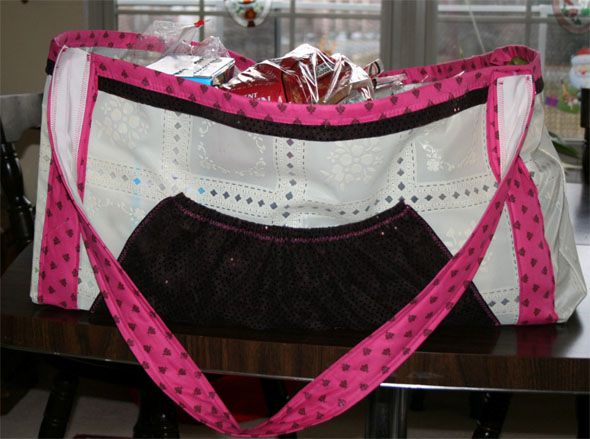

Really, who doesn’t need a giant bag? Your bag doesn’t have to be humongous, but I prefer one giant bag over 20 little bags. It’s easier on my fingers and faster to sew. Plus, I shop for a family of 4; I need a huge grocery bag. This bag folds up small and the vinyl material makes any spills easy to clean. To keep the shoulder straps from cutting off circulation to my arm, I cushioned them with quilt batting. The inside seams are reinforced with bias tape and the big front pocket is large enough to hold a carton of eggs. You can use a cute vinyl bag for trips to the beach, pool, gym, or even the laundry mat. Or maybe you just want to carry around a huge purse to embarrass your husband. Either way, your bag looks awesome! Tip: If you are using vinyl table cloth material like I did, try not to use pins to ensure the structural integrity of the bag.
Supplies
- 3/4 yard of vinyl material. I used a vinyl table cloth remnant
- 1/2 yard cotton woven for binding at top of bag and straps
- 1/2 yard of sturdy woven fabric. For pockets and binding accent
- 1/2 yard of batting
- 3 package of 1/2 inch bias tape
- Heavy Duty (upholstery) thread
- All purpose thread
- Walking foot
- Leather/vinyl needle
- 1/2 a yard of quarter inch elastic
- Basting spray
- Scissors
Tip: To get creases out of vinyl, hover your steam iron over the creases until they disappear.
Step 1.
Cut the following:
- Straps: 138 inches at 4 inches wide of woven cotton.
- Strap Batting: 138 inches by 2 inches wide. If you want shorter straps, take off 10 inches.
- Purse binding: 70 inches at 4 inches wide.
- Bag binding accent: 70 inches at 3 inches wide.
- Large pocket: 18 inches at 9 inches wide
- Small Pockets: Two 9 inch by 4 ½ inch wide
- Bag pieces: Two rectangles 30 inches by 16 inches.
- Two strips 32 inches by 10 inches (sew these two together to make one long strip).
Step 2.
Sew the two ends of bag straps together to make a giant loop. Double check to make sure the fabric isn’t twisted anywhere. Place batting strip to the wrong side center of the bag strap. Use basting spray to quickly secure the batting. Fold up sides of strip so they meet in the middle and iron. Pin in place for security.

Step 3.
To make pockets, turn the top edge of pocket under ½ an inch and sew down with a zig zag stitch. Cut a piece of elastic 1 ½ inches shorter that pocket length. Slip the elastic through the hem. Stitch down ends of elastic.


Step 4.
Take the long strip of the vinyl material and place rights sides together on large rectangle piece. Sew using heavy duty thread at ¼ inch seam. When you get to the corner, curve the strip. Eventually you will go back and clip the corner. Repeat with other piece.

Step 5.
To add some extra security to the seams, sew some bias tape to inside seams of bag. This is going to increase the amount of weight your grocery bag can safely carry. After all, you don’t want a watermelon to rip through the bottom of your bag just as you reached the 4th floor of your condo building.

Step 6.
Sew binding accent to top edge of bag. When you get to the end, fold the edge up at an angle.


Step 7.
The straps are going to be sewn all the way around the bag. This part is very tricky because you don’t want to use any pins, but you also don’t want any ugly rippling. Start one side at a time, sewing a few inches then switching to the other side of the strap. Smooth out the fabric as you sew, ensuring that everything is even. Sewing around the bottom of the bag is especially difficult. The trick is to sew slowly and alternating sides. When it is time to sew the other strap, make sure the lengths are even.

Step 8.
Sew a package of bias tape to the underside of shoulder straps to conceal the raw edges and to add more strength.


