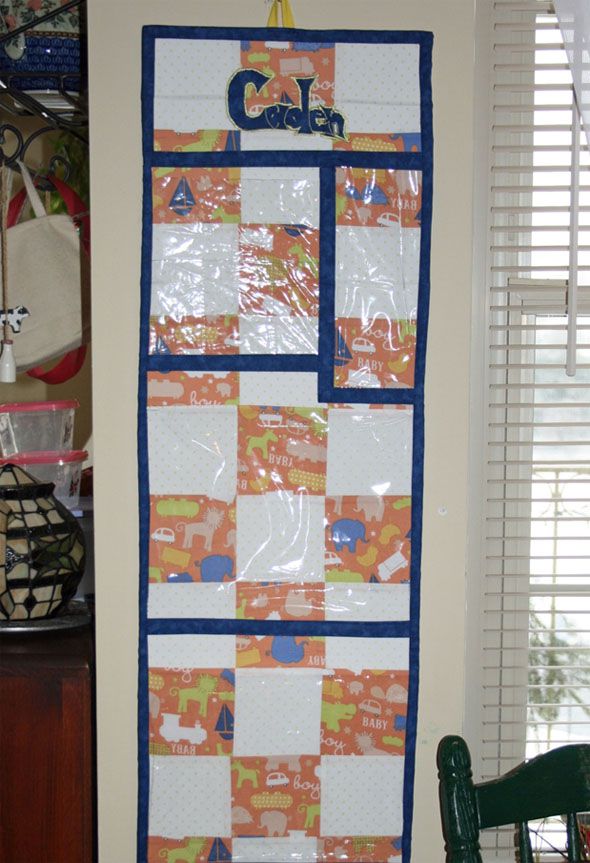
Hanging Wall Organizer with Clear pockets
Whether you’re cramped for space or just want your items to have a place all their own, a wall organizer is awesome! When you make your own organizer, you can personalize it fit your needs and your style. I made this for my toddler’s toys, giving me the chance to use up some kid friendly scraps I had lying around. The clear pockets are convenient and practical, allowing me to find items quickly. This is just the basics, you can add length or shorten or rearrange the pockets. You can use quilt blocks or one solid piece of fabric. You can even make this into a wall organizer that fold up for portability. Have fun and get creative with prints and colors or unusual combinations. Have fun and enjoy!

Supplies
•Scrap fabric
•½ a yard of Clear plastic. You can find this in the home decoration section of the fabric store.
•5 ½ yards of binding (check out our article on how to make your own binding on the blog’s homepage)
•Bobby Pins or Paper clips
•Even Feed (Walking) Foot. (Recommended, but you can do without it)
•Ultra Firm Fusible Interfacing
•Thread
•Universal needle (size 90/14)
•AccuQuilt Go Cutter (4 ½ inch square die)/ Rotary Blade and Rotary Mat
•Scissors
•Button (For fold up option)
Step 1. Cut out thirty-six 4 ½ inch squares, 16 from one color/ print, 16 from another. Using a quarter inch seam, sew 12 stripes with 3 squares each, alternating colors so you achieve a checkered pattern. Then sew 12 stripes together, stacking vertically. Press seams.

Step 2.
From the clear plastic material, cut three 13 by 9 ½ inch rectangles, two 4 by 9 inch rectangle, and one 5 by 9 ½ inch rectangle. If you want pockets to hold more volume, add an extra inch of width. *Tip: To get any folds out of the plastic material, put in the dryer on delicate for 1 minute with a wet towel. Set a timer or it will be ruined.
Step 3.Cut out one 12 by 46 ½ inch rectangle from Ultra Firm fusible interfacing.
Step 4.Fuse interfacing to the fabric squares you sewed together. If you haven’t used interfacing before, follow the directions on the little plastic sheet that came with the interfacing when you purchased.
Step 5. Place your clear plastic squares on fabric to your liking. I left a 1 ½ inch space between the 13 by 9 ½ inch rectangles. When you have your pockets placed, secure down with bobby pins or paper clips.
Step 6. I have to admit, sewing the pockets is a bit frustrating. The stiffness of the interfacing combined with the slippery plastic is difficult to maneuver. Start by sewing down the sides of the pocket. The middle of the pocket will poof up (for volume), so to sew the bottom you have to add a little pleat in the corners to make it lay flat.

If you want the pocket to be tight, cut off an inch.
If you want smaller pockets, divide pockets by sewing a seam down the middle or into thirds.
Step 7. Separate your pockets with strips of binding. I placed my binding on the bottom of the pocket to conceal the seams. Fold binding in half and sew along both edges as closely as you can.

Step 8. Sew binding on back fabric (1/4 inch seam), matching raw edges.

Step 9. When you get to the ends, just fold them under to save time. You can finish the ends with a diagonal seam like you would a quilt, but the stiffness of the interfacing makes it more trouble than it is worth, in my opinion.

Step 10. Turn binding over to the front and sew down as closely to the edge as you can.

Do a fast faux miter for the corners by folding the binding onto itself.

Step 11. Sew a little hoop from some left over binding or ribbon/string to hang organizer on wall. If you don’t want to put a nail into your wall, those Command Hooks are great! They really do work very well and leave the wall clean.
Step 12. To make your wall organizer portable, fold up along the pockets and mark where the loop would connect to a button. Hand sew a button and you have a foldable wall organizer for on the go!


