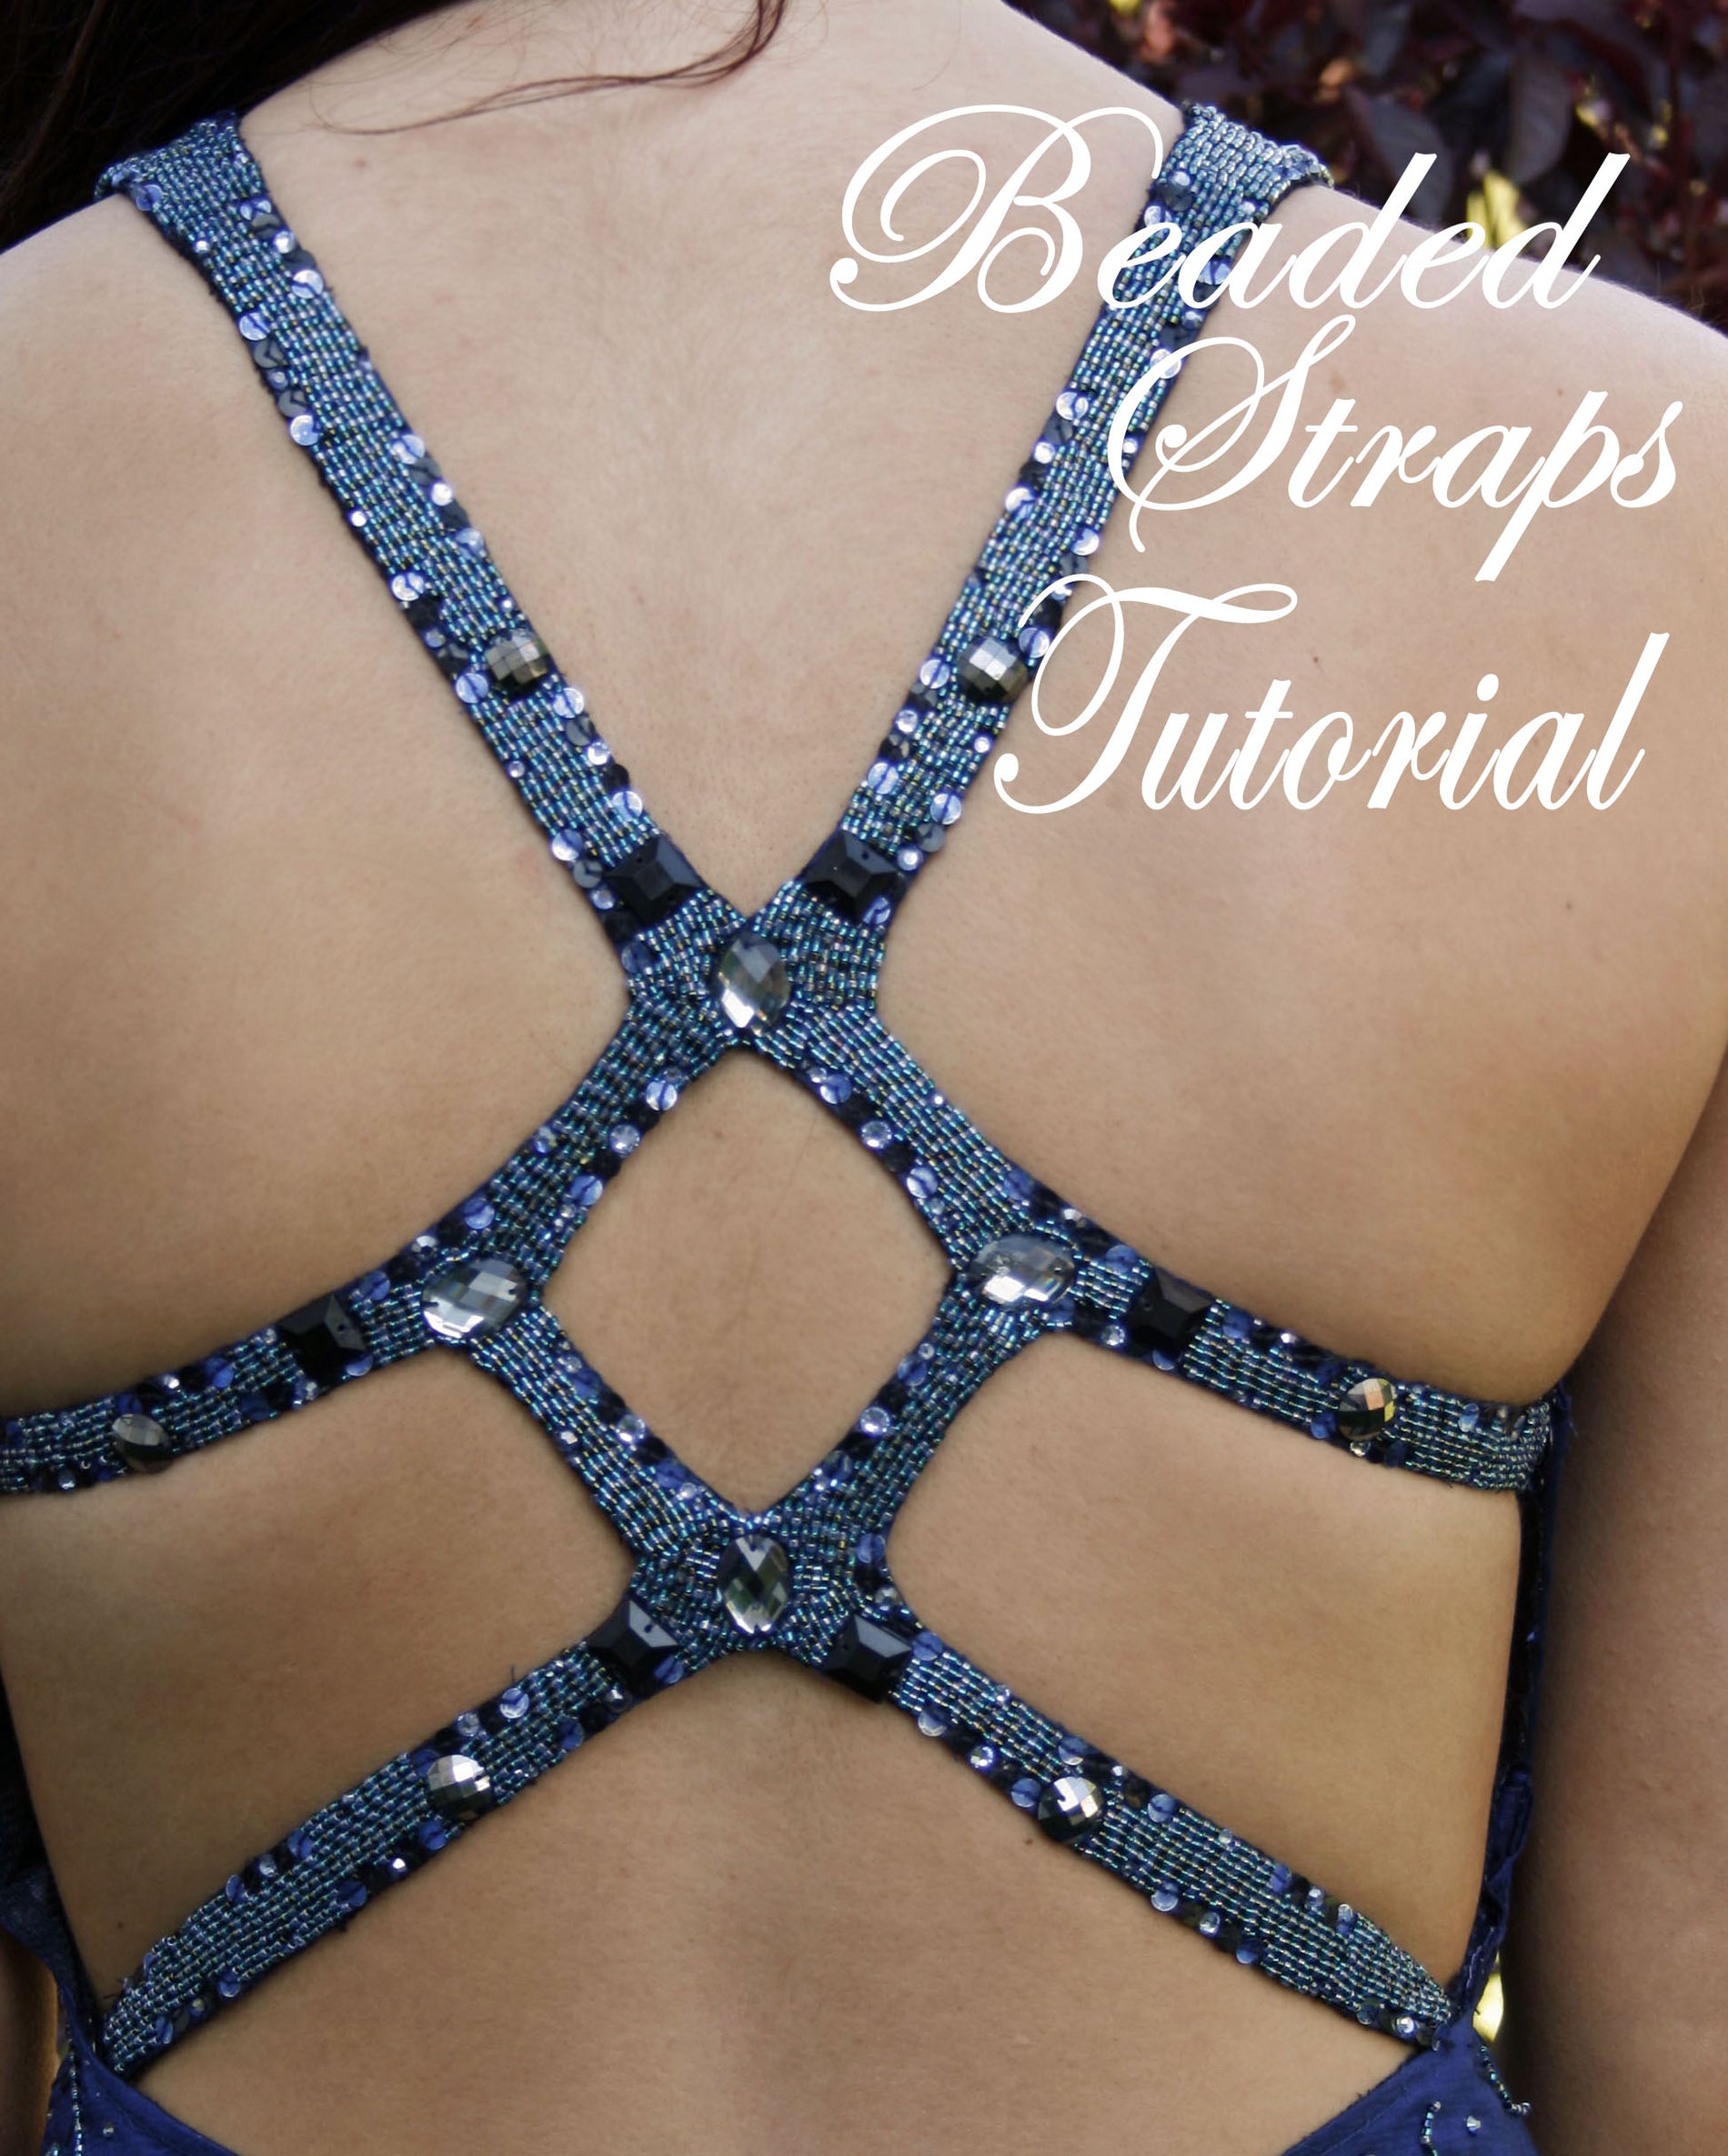
If you want to turn the back of a formal dress into something amazing, get ready to do a TON of beading. By hand. Oh yeah! Time to work those nimble fingers into fashion glory with this beading marathon. In this tutorials, we are going to take out the existing back of a formal dress and completely reconstruct it. WARNING: This project takes a substantial amount of time to complete. Most of the time will be spent on the beading, but you can shorten the time by using larger beads or pre-beaded appliqué strips. To give you an idea, I was able to watch all 5 seasons of Burn Notice before I was finished beading. It's a lot.

First, you will need a body form. I made a custom duck tape body form for my client and it worked like a charm. Second, if you have never beaded before, no big deal, it's pretty simple. However, there are a few things that will make it easier:
Beading Supplies:
Small Appliqué Needles. Because we are going to bead through 2 layers of fabric, flimsy beading needles won't get the job done. Best to go for appliqué needs.
Needle Threader. After 4 straight hours of beading, that small hole will become your enemy. Needle threader is definitely a time saver.
Thread Conditioner. Thread Heaven or bees wax work well to prevent tangling and knots. This is a required supply!
Nylon Thread. It's strong yet light and flexible. Warning, you'll notice as you work that it does have a tendency to become knotted. This is why thread conditioner is so important.
Bead Tray. Because beads come in impractical containers, you'll want to just pour out a hundred of each bead type at a time into a tray that you can easily carry around. Put a piece of fabric on the tray to keep the beads from rolling too much.
Buy Extra. When I first started this project, I underestimated exactly how many beads I would need. When I went back to buy more, the store didn't have the exact colors anymore. Oops! Try to over buy, keep the receipt if you have any unopened containers left.
Construction Supplies 1/2 yard of fabric to match your dress. If you can't find a perfect match, no big deal. It will be covered by beads.
Matching Thread
Size 80 machine needles
Dressmaker's chalk
1/2 yard of black stabilizer
1/2 yard of black Iron on interfacing
2 yards of 1 1/2 inch wide muslin
If your dress is tight fitting you will need Fasteners (hook and eye, snaps, etc)s
Beads: (note: you can get any kind of beads, jewels, sequin, rhinestone combination you like, this is just what I used)
Nylon Thread
Small Appliqué Needle
Super Glue
16 Large Jewels (I had them in 3 different shapes)
1 Bag dark blue sequin
1 Bag Matted Black sequin
At least 3 containers of:
Black Seed Beads
Periwinkle Blue Seed Beads
Smoky Seed Beads
Aquamarine Seed Beads
*You'll notice that some of the seed beads appear to be pearlescent, which is great. Aim to get the above mentioned colors in pearlescent tones.
Step 1
Print out the provided pattern and adjust to fit your dress.You may need to add some length to the pattern if your dress is larger than size 2.

Simply add an inch at a time to the strap ends and cut the template out of muslin. Pin the muslin template on to the dress form, making sure to line up the center of the template with the center back. You want an extra 1 1/2 inches on each strap just in case. Now, pin the muslin strip on the dress form the new back shape and chalk an outline.
![]()
Also, line up the existing shoulder strap to the muslin shoulder strap and mark where they meet at the shoulder. Mark the seam with chalk. This is where you will be sewing the new back piece to the should straps.
Step 2
Pin the dress securely to the dress form beneath the chalk marks.

Step 3
Cut carefully along the chalk marks.

Step 4
Fold the fabric under twice (1/4 inch each fold) and sew by hand. Once you are sure the back is exactly where you want it to be, sew in permanent stitches on your machine. To make sure the zipper doesn't come off, simply sew a few stitches around the zipper teeth (on each side, not together) where you cut.

Step 5
Cut the pattern on a fold. You will need 1 piece from fabric matching the dress, 1 from the stabilizer, and 1 from the iron on interfacing.

Step 6
Sew a 1/4 inch stay stitch around all edges.

This will make it faster and easier to press the fabric under evenly.

When you get to a corner, snip it just a tad so the raw edges will fold under.

Step 7
By hand, attach the stabilizer to the wrong side of the back piece with a basting stitch. We want to do this by hand to ensure all the edges line up perfectly. Then, you can secure with a straight machine stitch. I don't recommend using basting spray or iron on adhesive because, chances are, you are using delicate fabric.

I mistakenly used white stabilizer. Oops!
Step 8 - Beading Time! I will show you the pattern I used for my beading on a template just because I think it is easier to understand. First, you want to add the large jewels. When you are placing them, make sure the jewels are evenly measured from one another. This is the jewel pattern I used Next, we add in the sequin and rhinestone pattern. Add the rhinestones first with super glue. Then, sew in the sequin.
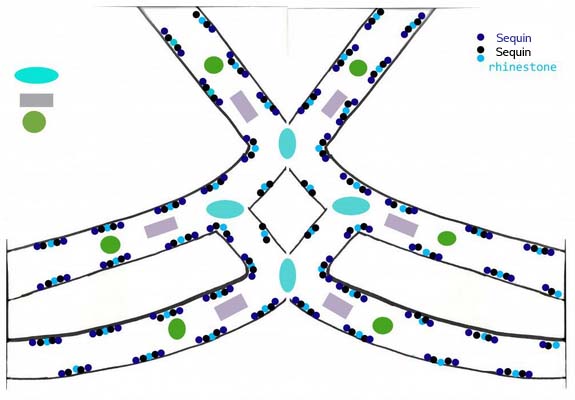
Lastly, we are ready for the seed beads. The technique for sewing in seed beads is super simple. I followed this pattern:

Step 9
Pass the seed on to the needle.

Pass the needle back down through the fabric as close to the bead as you can.

Bring the needle back up behind the needle.

Pass the Needle back through the seed.

Add more beads. You can add up to 4 seed beads at a time. Simply repeat the process.

It should start to look like this:

Step 10
Stop beading when you get about 2 inches from the end of the straps. Apply the iron on interfacing to cover up the bead stitches.
Step 11
If you dress is tight fitting, you will only be able to sew the shoulder straps together. You will have to attach the remaining 4 straps with fasteners. I recommend these bad boys:

Step 12
Sew the clasp to the straps and the hooks at the natural waist and hips.

Fill in any remaining exposed areas with beading. Congratulations! You have just completed a beading marathon! When the party is over and it's time to hang up your awesome dress, you can sit back and admire your handy work! And heal those poor fingers. Happy Sewing!


