I recently began experimenting with Shirring and, in my opinion, it is the fastest, easiest way to whip out clothing. No need to cut out a complicated pattern, all you need is a long, rectangle piece of fabric! Now, you may think Shirring is only for summer clothing, and to that I say, “Nay!” Simply add a cute cardigan or some awesome sleeves to keep you warm. And any shirred dress or skirt looks fabulous with a cute pair of tights or leggings. Most importantly, Shirring can be used to make a variety of clothing that is flattering on every body type. In this tutorial, I will be showing you how to make a simple shirred sleeveless dress. However, you can use shirring to create other stunning silhouettes. For instance, you can add a few lines of shirring to the waist of a loose fitting shit to slim down your midsection. You could also add shirring to the bottom of your shirt to create a hip-hugging look. Or, add a little more volume to sleeves by shirring the bottom edges. Oh! And nothing is more adorable than seeing a little girl wearing a cute baby doll dress with shirring at the top! It just melts the heart!
Necessary Supplies:
1. Fabric 2X your bust measurement. Ex. If your bust is 36 inches, you need 2 yards.
2. Sewing Machine
3. Needle appropriate for fabric weight
4. Elastic thread
5. Thread
6.Fabric scissors
7.Tiny screwdriver
For most sewing machines, shirring is as easy as loading elastic in the bobbin case and sewing a straight line. However, if you have a brother sewing machine, you may have to do a little tweaking. Before I begin the tutorial, I will give instructions for all the Brother users out there.
Remove your throat plate and take out the bobbin case. Locate the tiny green spot on the left side of the bobbin case. Basically, it is a small screw covered in green paint. Using your tiny screw driver, rotate the green screw 1 ¼ times. It should look like this:

Replace bobbin case, making sure to match up the white notches. You should hear a little click sound when the bobbin case is put in correctly. (Don’t forget to return the green screw to its original setting once you finish this project!)
The key to shirring is elastic thread in your bobbin. Slowly, wrap your bobbin with elastic thread by hand. You only need a little tension in your fingers when you are loading the bobbin. This is a tedious task, and depending on how many lines of shirring your project requires, you will be re-loading elastic thread often. Your bobbin should look like this when finished:

To load the bobbin, remove the throat plate and insert bobbin in bobbin case. You need to remove the throat plate because you will be manually pulling the elastic thread up. Guide the elastic thread through the first grove. Then, by turning the needle wheel on the right side of your machine, allow the needle thread to hook on the elastic thread and pull up to the top of the feed dogs. Like this:

Replace the throat plate.
Generally, you will want to have your thread tension around a 3 or 4 for shirring, but since I am sewing on very light material, I’m going to be using a 5 tension.
Set your stitch length to the highest allowed.

Now, let’s get to the fun part! Pretty much all you do is sew a bunch of straight, parallel lines about ¼ inch between each other. Because your stitch length is so long, your machine is going to be sewing very fast, so try to sew slowly till you get a good feel for what you are doing or else your lines will be uneven and messy.

Immediately, you can see the fabric bunching up! So cool! Also, really enforce your reverse stitch to lock in your first few stitches. I usually backstitch 3 times, just in case.
When you are ready to start your second line, hold the fabric taut so it lays flat. This will ensure the elastic can do its job properly and that all your lines are uniform.

After each line, knot the ends of the thread for extra strength. Skipping this step has really messed up my projects in the past. I go to sew the dress together, thinking I am finished, and one of the shirring lines breaks open! Ahhh!

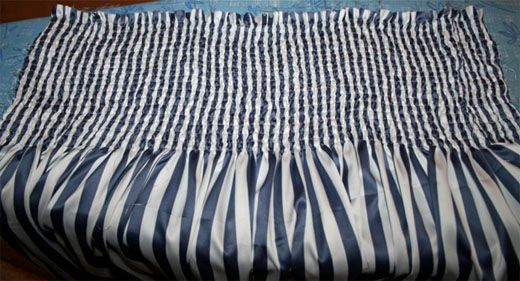
Depending on what you are creating, you can shirr as many lines as you want. I am going to shirr about 20 lines, just enough to cover the bust well. It is really starting to look like something!

Now that you have sewn all the lines, here is the real trick of shirring: steam! Hold a steaming iron as close to your fabric as you can WITHOUT touching it. The steam is going to shrink the elastic thread, giving your top even more stretch. Observe before:

And after steaming:

Shrinky dink fantastic! All you have to do now is sew the ends together and hem the top and bottom of your dress! Congratulations!

Isn’t it awesome how fast and easy that was! Now you have time left over to bedazzle this baby! I personally plan to bust out the good old sequin stash and bling this hot little number out until it blinds the neighbors!


