
Ever been completely bewildered by your sewing machine? So many buttons and knobs and little parts - which parts is which???
We understand. We were once there, too. So, to go along with our Beginner's Guide to Sewing, we've made this little reference guide to elaborate on those parts we went over in the videos- plus a few extras.
It's all alphabetical so you can quickly find the part name.
Bobbin: A stitch is formed buy looping the bobbin thread and the needle thread together like this:

HBR/Wikimedia Commons
The bobbin is essentially a second spool of thread. Different machines use different bobbin sizes, so it's important to consult your manual or locate your machine in our database list before buying new bobbins.
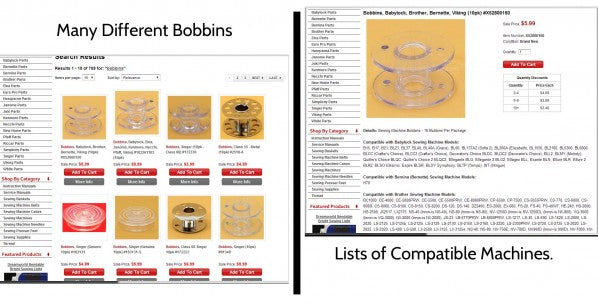
You'll notice that some bobbins are plastic, while others are metal. There are people who swear by metal bobbins, as they tend to be more resilient. Speaking of resilient, a bobbin that is nicked, bent, cracked, or damaged in anyway needs to be thrown out. Even the slightest damage will affect how the thread is pulled off the bobbin.
Bobbin Case: Your bobbin's home. It's composed of a hook rotary system that needs to be cleaned every few projects. When you turn the hand wheel towards your body, you'll notice the shuttle system move. As the needle thread is pulled around bobbin case, it wraps around the bobbin thread, and pulls it up through the needle plate.
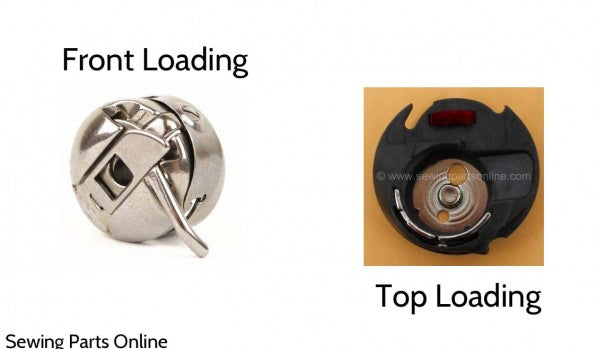
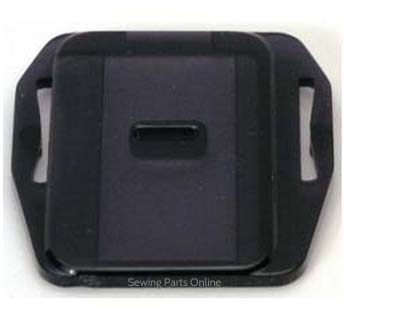
Bobbin Cover: For front loading bobbins, you remove the storage compartment to reveal a flip-down cover. Most top loading bobbin machines have a clear clip-in cover.

Bobbin Tension: As if tension wasn't confusing enough, the bobbin has its own tension system, though you don't ever really need to touch this as a beginner. Just keep it at the factory setting for now. As you gain more experience and become more comfortable, you can mess around with the bobbin tension. (i.e. for shirring fabric with elastic thread).
That being said, we demonstrate how to check the bobbin tension and adjust it in Episode 5: Troubleshooting and Maintenance.
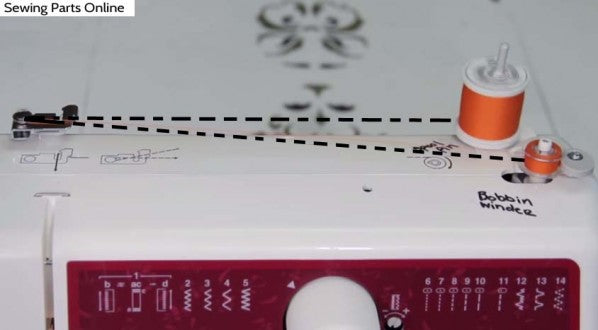
Bobbin Winder: The majority of sewing machines have a built in bobbin winding system, as shown in the video. This loads the thread on to your bobbin for you, instead of having to hand wind. The key is to make sure the thread spool is feeding to the bobbin smoothly. A proper bobbin is wound evenly, just like a spool of thread. No one end should be thicker than the other, nor should any knots or tangles have formed. Once you see a tangle form, unwind the thread and start all over again.
Tip: Wind your bobbin at a medium speed. If you go too fast, it can stretch the thread out, making the thread more susceptible to breaks, as well as warping the appearance of your seam.
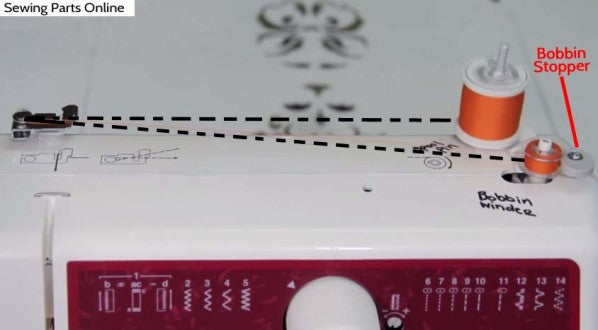
You'll notice that some of the bobbin stoppers have a little screw on the top. By slightly unscrewing, you can adjust the fullness of your bobbin. For instance, there is no need to fill a bobbin to the brim if you only plan to use that thread color for a seam or two.
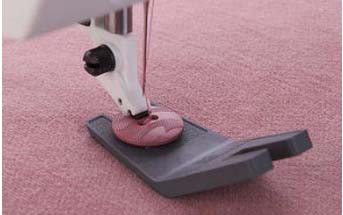
Button Shank Plate: This is used to attach buttons to heavy fabric, like denim. It can also be used when sewing over thick seams, like when sewing jeans, as it prevents uneven stitches.
Darning Plate: On some machines, the needle plates can be changed out for specialty plate. For instance, if a machine (like the Brother in our video) doesn't have a "drop feed dogs" lever, one can simply install the darning plate to achieve free motion sewing.
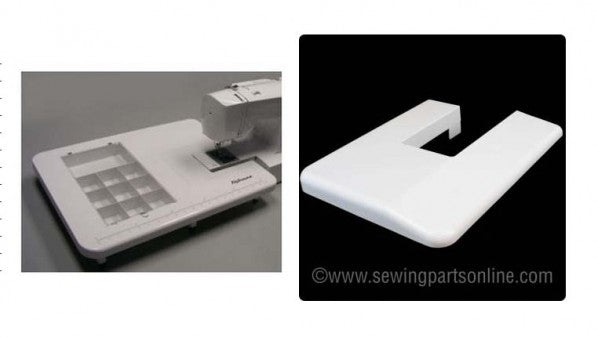
Extension Table: This is the removable/free arm sewing bed. To remove, you simply 'pop' it out of place. Buy removing this section, you are able to more easily sew circular projects, like hems and cuffs. Very often, this part doubles as a storage compartment. For front loading bobbin machines, you must remove the extension table to access the bobbin.
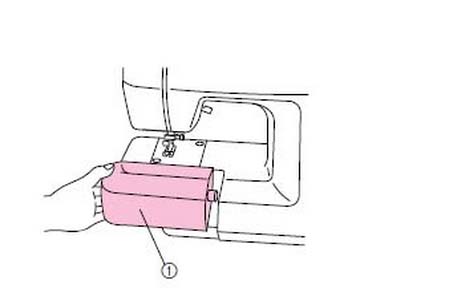
There are also accessory extension tables you can use with your machine. When sewing larger projects, especially quilts, it's helpful and often better, to support the extra bulk with an additional extension table. However, you can also use your arm or flip the extra fabric over your shoulder. If not supported one way or another, the weight will pull the fabric to the side, making sewing more difficult and stretching the fabric.
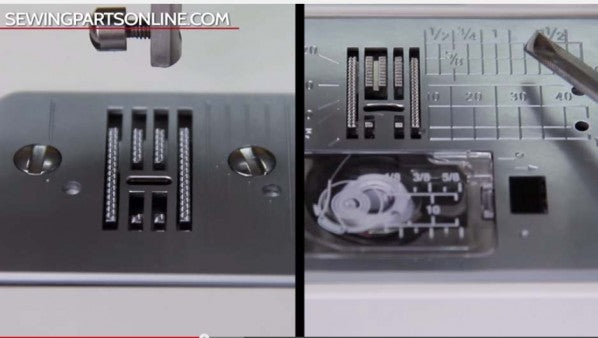
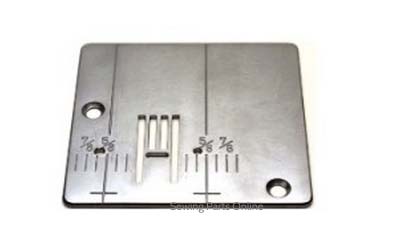
Feed Dogs: These are those metal teeth located within the needle plate. When sewing, these teeth grab on to the fabric and pull it through the machine. Many machines have the option to "Drop Feed Dogs". This means the feed dogs are lowered into the machine, thereby disengaging them.
But why would you want to disengage/drop the feed dogs? Because when doing free motion sewing/darning/quilting, you move the fabric freely and in any direction or shape you want. If the feed dogs were to remain in use, you'd be fighting against their pull, which damages the machine and creates ugly stitches. If you machine doesn't have a drop-feed option, you would simply install a darning plate (see Darning Plate).
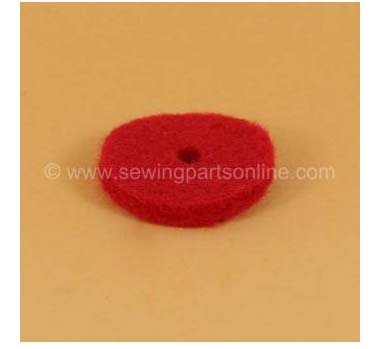
Felt Cushion: This is placed on the spool pin under the thread spool. It's suppose to make the spool pin spin better. I say suppose to, because I've never actually used one on the account that I've always lost it straight out of the box.
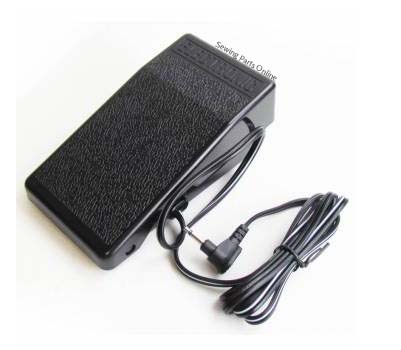
Foot Controller/Pedal: This little pedal is how you control the needle. Be wary of a lead foot; you don't always have to go max speed. In fact, I recommend sewing slowly until you get more experience under your belt. As you sew more and more, you'll operate the foot controller as well as you operate a gas pedal - or even better, if you're like me.
Foot Pressure Dial: A pressure foot dial lets you customize how much physical pressure is apply by the presser foot on to the fabric. This is especially helpful for very lightweight and very heavy fabrics, as adjusting the pressure makes for better seams and fabric control.
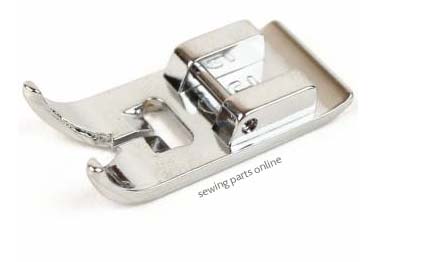
General Purpose/Zig zag Foot: For basic sewing, you'll use the zigzag foot/all purpose foot/general purpose foot. It has the wide opening to accommodate a zig zag. You'll use this foot to do straight stitching, satin stitches, and a ton of decorative stitches. It's basically your go-to foot.
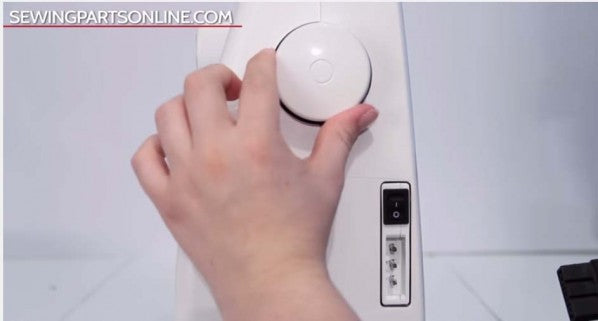
Hand wheel: The first functional sewing machines used a hand crank to stitch the seams. This hand wheel is mostly used to bring the bobbin thread up through the needle plate and to raise/lower the needle for position changes/pivoting corners. When turning the hand wheel, make sure to turn it towards your body.
Lint Brush: Yup, you'll have to dust. If you want to keep your machine operating smoothly, try to clean out the lint every few projects. Certain fabric, like those with a pile (velvet) need to be cleaned out after every project, because the lint builds up so badly. You don't have to use the brush that came with your machine; many people have a combination of tools to cleans the best possible. Tip: You can use pressurized/compressed air to clean the lint from your sewing machine. Spray away.
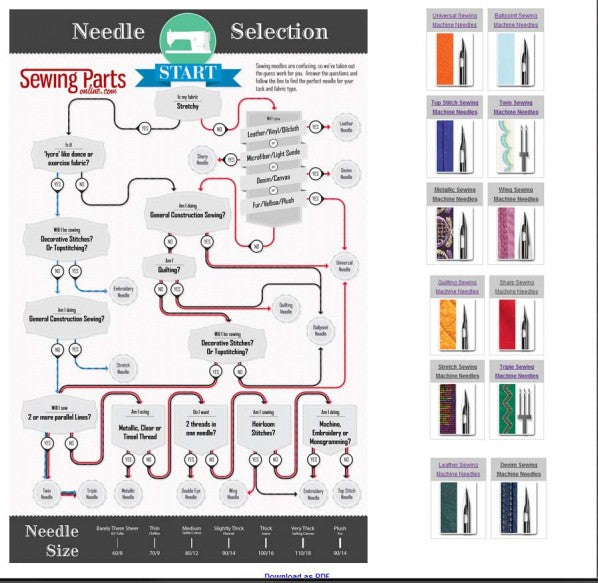
Needles: There are a TON of different types and sizes. Here's the thing, needles are really important. You have to use the correct needle for your fabric, the fabric weight, and the task to be successful. It's so important, we made a whole flow chart to help you pick the correct needle by answering "yes" or "no". Plus, knowing you already have the correct needle is one less troubleshooting step.
TIP: You'll hear you need to change your needle after every project. Unless you are using super cheap needles, you can use the needle for more than one project. With quality needles, you can get a good 15 hours out of them. Once you gain more experience, you'll be able to recognize when the needle is dull and needles to be changed. This usually happens when the thread is bunching and stitches are uneven despite the tension being perfect.
Needle Plate: This metal plate covers the feed dogs and bobbin casing. Nearly all needle plates come with some kind of etchings to act as a seam allowance measuring guide. The etching help keep seams straight.
Needle Threader: These come in very basic to completely computerized and automatic. Many people have difficulty threading the eye of the needle. By having a needle threader, you prevent eye strain and making threading your machine more efficient, as a needle threader is usually much faster than the old fashion "squint-and-pray" method.

Presser Feet: Oh, boy. Where do I start? These are special attachments that are either required (i.e. walking foot for quilting) or make sewing significantly easier (i.e. binding foot). As a beginner, you'll use the general purpose foot (also called a zig zag foot or all purpose foot) and walking foot the most. Presser feet attach to the machine shank, which is either "High", "Low", or "Slant". Snap on presser feet are great, because they are easy to install. They are used by clipping into a Snap-on Shank Adapter. All new machines come with their own snap on shank adapter.
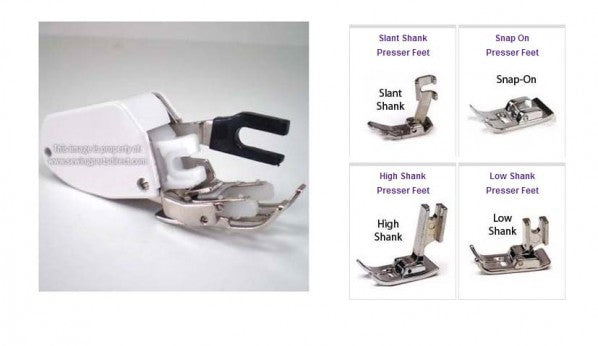

When shopping for presser feet, you must first know what type of shank your machines has and the maximum stitch width. For instance, if your maximum stitch width is 7mm, a 5mm presser foot isn't technically compatible with your machine. However, you can still use a 5mm presser foot, just need to test your needle position by carefully, manually turning the hand wheel and watching where the needle touches. Of you don't test first, you may break your needle on the presser foot. Nobody likes small, flying metal shards.
We have a library of presser feet videos demonstrating what each foot is used for and how to use it. Be sure to browse if you're curious.
Reverse Button: All machines have one of these. It's because the start and stop of every seam needs to be back-stitched in order to lock in the threads. By reinforcing the first few stitches, you prevent the seam from busting opening when tension is applied.
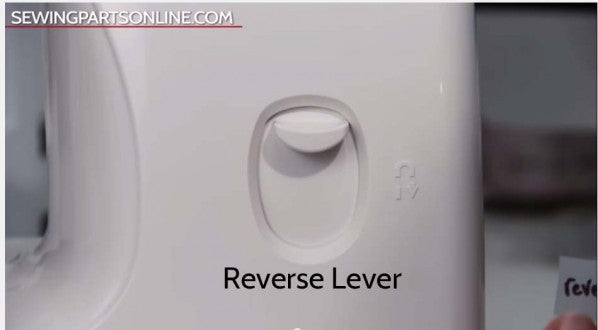
TIP: If the start of a seam is going to crisscross with another seam, like when piecing quilt blocks, you don't really need to repeatedly back stitch; it just takes too much time. Also, if you're sewing a basting stitch (or any seam you know you'll rip out) don't back-stitch, because it's harder to removed stitches that have been reinforced.

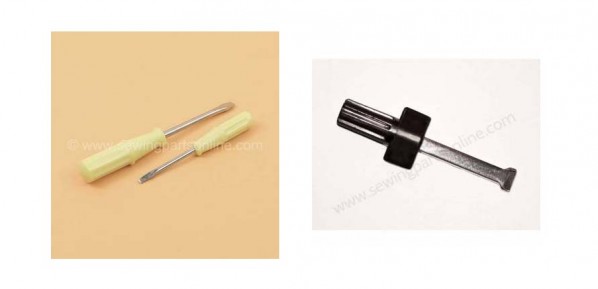
Screwdrivers: All machines come with tiny screwdrivers to remove the shank screw and to remove the needle plate. The screws are very small, so make sure to keep track of them. They tend to roll away.
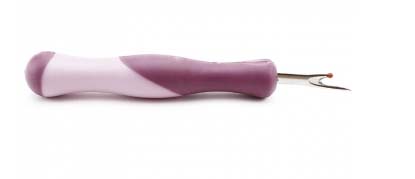
Seam Ripper: This little tool has a sharp, hook-like end that slides under the stitch and cuts the thread. Or, you can use it to pull out each stitch, eventually removing the whole seam in one piece.
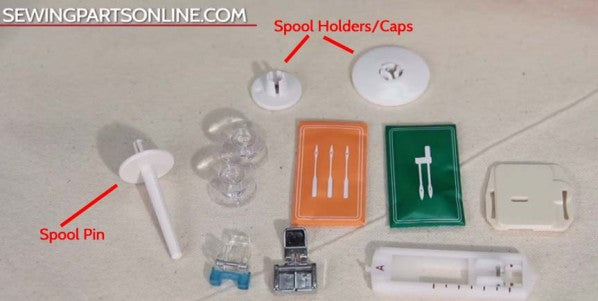
Spool Pin and Holders/Caps: The spool pin is what holds your thread spool. Some are vertical, some are horizontal. A spool holder/cap is a little stopper that secures the spool in place. Without the holder, the thread spool would be yanked off while sewing.
Start/Stop Button: Technically, this feature allows you to sew without using your foot controller. But, really, it's used to start and stop automatic sewing, like machine embroidery and automatic buttonholes.
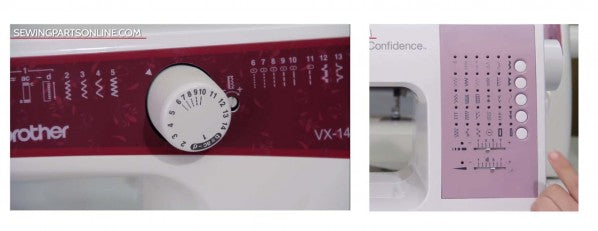
Stitch Selection Dial: Some machines have a very basic knob that turns to select the stitch, while others have multiple buttons or are completely computerized on a touch screen. The stitches are numbered on your machine, but in most manuals it has both the stitch number and the name of the stitch (satin, stretch, zigzag), as well as the tension, length, and width setting.
Stitch Length: Increasing makes the stitch longer, which is great for basting stitches or when sewing very heavy fabric. The longer your stitch length, the more you'll need to lower the tension. The opposite goes when reducing the stitch length, like when creating a satin stitch. The shorter your stitch length, the more you need to increase the tension.
Stitch Width: This determines how wide or narrow you want your stitch. Generally, machines are either maxed out at 5mm wide or 7mm wide. Meaning that the widest zag zag stitch you can make is either 5mm or 7mm. This is important, because you never want to install a 5 mm wide presser foot on a 7mm sewing machine without first testing you needle position and width by manually turning the hand wheel.
Tip: When sewing a straight stitch, you can change the needle position by adjusting the stitch width.

Thread: There are so many different types of thread on the market. As a beginner, you'll start out with All Purpose Polyester thread. Polyester thread won't shrink, stretch, or loose it's color (at least not for a long time). It's very strong and easy to use. No fuss or fluff, and it can be used with virtually all fabric.
As you continue your sewing journey, you'll love learning about new thread, like metallic, embroidery, clear, and nylon. There's even glow-in-the-dark thread!
Tension Knob: Tension is one of the scariest things to learn for new sewists. But really, it's just a game of tug and war. As you're learning, try to stick within the automatic tension range; after all, mastering a straight stitch is hard enough.
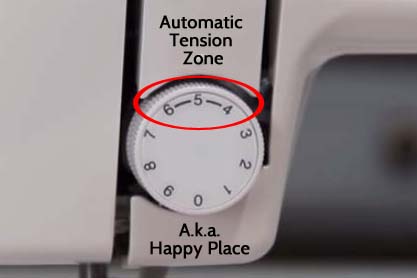
Remember, most manuals list the tension settings for each stitch. If you do need to adjust the tension, do it 1 or 0.5 intervals at number at a time.
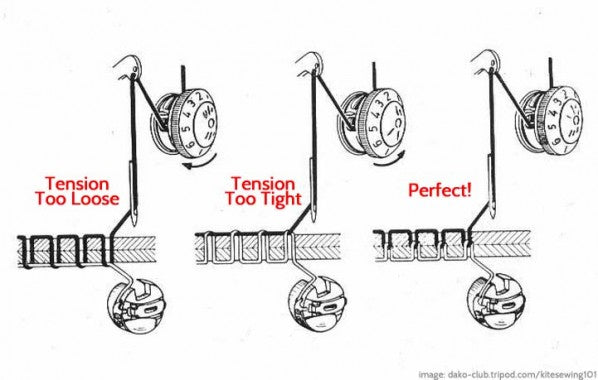
Here's one way to think of it; imagine a dog on a leash. If little Spot wants to run 10 feet (i.e., a long length) in front of you, you'll have to loose your tension/grip on the leash, right? If you want him to stay close to your heels, you'll have to tighten your hold on the leash. It's the same thing for tension. The further the individual stitch needs to travel, the more ease it needs, thus less tension.
The longer/wider the stitch, the less tension, because the stitch has a longer distance to travel.
The thicker the fabric, the less tension, because you need more thread for each stitch to do through a thick piece of fabric.
The opposite applies when sewing a short/narrow stitch and thin fabric. A balanced stitch will only show the needle thread on one side, and the bobbin thread on the other side.
If you're feeling brave, play around and see what happens. Put opposite colored thread in the bobbin and in the needle and adjust the stitch and tension settings.
If the bobbin thread is visible on the top of the fabric, then the needle tension is too tight.
If the needle thread is seen on the bottom of the fabric, then the needle tension is too loose.
Tension Disks: The thread is passed though these plates as part of threading your machine. Make sure you literally floss the thread between the disks. These two metal plates are pushed together when the stitch tension is increased and pulled apart when the stitch tension is lowered.
Thread Cutter (built-in the machine): Many modern machines have a tiny blade attached to the left side of the machine to conveniently cut thread tails instead of looking for scissors after every seam. More advanced machines will have a automatic thread cutter built into the bobbin area. You simply press a button, and the thread tails are trimmed to roughly 1/4 an inch.
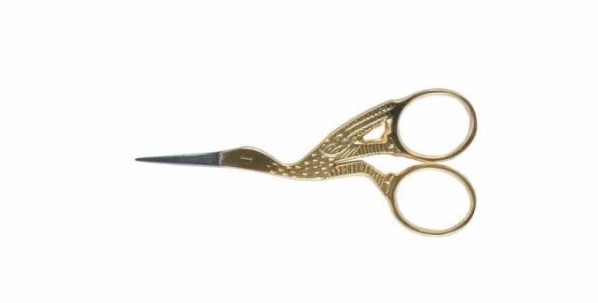
Thread Nippers: These are just small scissor you keep next to your sewing machine. At the end of a seam, just clip the thread tails. Of course, if your sewing machine has a built in thread cutter, you can skip these.
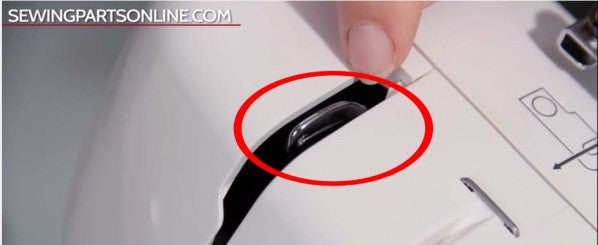
Thread Take up Lever: Always make sure your thread catches on this when threading your machine. It's kind of difficult to see, but if you move it to the highest position by turning your hand wheel, it's much easier to visualize.
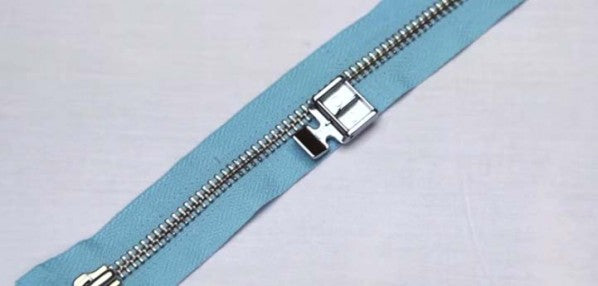
Zipper Foot: There are adjustable zipper feet, invisible zipper feet, and standard zipper feet. I can't emphasized enough how much you have to use these foot when installing a zipper. Watch this zipper foot video to learn more.