
Time to sew a fabric drawstring gift bag! This is perfect for the holidays! Change up the fabric and you can use these little gift bags any time of the year. Today, I am going to show you how to make two different types, lined or unlined.
SMALL UNLINED DRAWSTRING BAG
PREPARE THE FABRIC
This little unlined bag is super simple. Pick a fabric that you like. Cut a 5x12 inch rectangle. Because the long edges will be exposed, it is best to finish them. You can use pinking shears, serge them, or even use an overcast foot.
Now, on each side, mark 1/4 inch from the edge. Then mark 1 inch from the edge. Fold on the 1/4 inch lines and press. Use basting glue to hold the seam in place. Then fold on the 1 inch lines and press. Open the fabric back up.

Do not glue at this point. This just helps in a future step. Now, fold the fabric, right sides together, matching the hem. Make sure that the sides are even. Pin the sides.

SEWING THE POUCH
Set your sewing machine to a straight stitch and a 2.40 or medium stitch length. You will be sewing a 1/4 inch seam allowance. Sew both sides of the bag, leaving the top open. On each side, make sure that you backstitch at the beginning and at the end.

Now you have a basic pouch.
CREATING A CHANNEL
Now that you have created a basic pouch, we need to make a channel for the twill tape. This is what is going to make it a drawstring bag. Fold on your pressed 1 inch line. Align the seams and pin.

Then pin around the remainder of the top. Take your pouch back to the sewing machine. This time you need to do an edge stitch. This is simply sewing very close to the edge.

When you begin sewing, remember to backstitch. Make sure that your fabric on the bottom is flat, sew a couple of inches. When you go over the seam, backstitch. We’ll be opening up this channel and we don’t want it to rip out. After you’ve sewn a couple of inches, stop, readjust, and sew a couple more inches. Keep doing this until you make it all the way around. Backstitch at the end. Once you have sewn the entire way around, turn your pouch right side out. With a seam ripper, carefully pick the stitches within the channel to create an opening for the twill tape. Do this on both seams.
MAKE IT A DRAWSTRING BAG
Cut two pieces of twill tape, each approximately 17 1/2 inches long. Using a safety pin or a bodkin, start on one side of the bag. Feed the twill tape through to the other side, continue to feed it all the way around the bag, coming out of the channel on the same side that you began.

Then do the exact same thing, except starting on the other side. Even the tape out, leaving several extra inches on each side. Tie a knot on each side, close to the bag. Trim the ends of the tape and use Fray Check to prevent the ends from fraying. Let that dry. All done.

MEDIUM LINED DRAWSTRING BAG
The small unlined bag is super easy and quick. The medium lined drawstring bag is also easy; however, it does take just a little bit longer since you are going an extra step and adding a lining. Personally, I love the medium lined drawstring bag. I think it is very cute!
PREPARE THE FABRIC
To begin, first, select an outer fabric and a lining fabric. Cut two pieces of outer fabric, both 10 x 12 inches. Repeat this for the lining fabric. Next, on both the lining fabric and the outer fabric, leave one of the short sides open and then pin the remaining 3 sides.

On the lining fabric, on what will be the bottom, mark an opening that is 4 inches wide. Leave this open as it will be needed in order to turn the fabric right side out.

SEWING THE POUCH
First, sew the outer fabric. Once again, you will be using a straight stitch and a 2.4 stitch length. Sew, using a 1/4 inch seam allowance. When you begin, make sure you backstitch. When you get to the corners, sew up to 1/4 inch from the edge, leave your needle in, lift up your foot, pivot your fabric 90 degrees. Lower your foot and then keep on sewing. When you get to the end, make sure you backstitch. Do the same thing for the lining fabric, just remembering to leave that opening. Once you have sewn both, press open all of your seams.

BOXING THE CORNERS
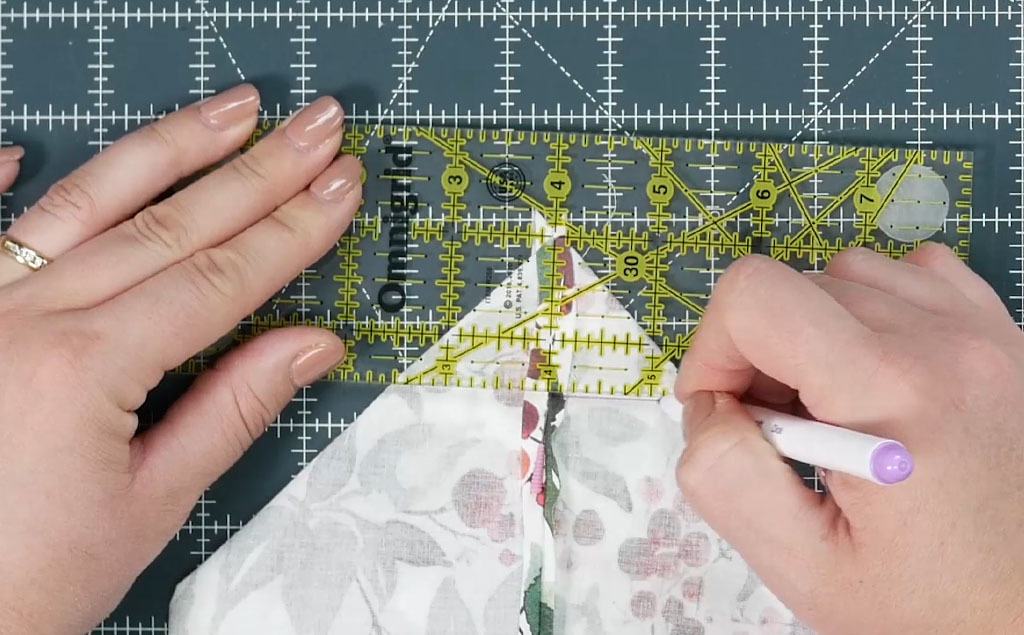
Now we have to do what is called boxing the corners. Pinch your corners.

To make sure they’re lined up correctly, first, put a pin through the center of the front seam and keep poking the pin through until it comes out in the center of the back seam. Bring the pin up the seam and stick it in the center of the back seam, coming back to the front.

Then pin it in place. If you have a clear ruler, that is really helpful. You want to place one of the lines from the ruler on the seam and measure 1 ½” from the point. Draw your line. If you were making the large bag, the directions would be the same; however, instead of drawing a line at the 1 1/2 inch mark, it would be at 2 inches.
Repeat for both sides on the lining fabric and the outer fabric. Stitch directly on the line. When you get to the end, leave your needle in, lift up your foot, and turn your project all the way around. Sew back down the same stitch line you just did and backstitch at the end. Trim off the excess, leaving about 1/4 inch.
ATTACHING THE OUTER AND LINING FABRIC
Turn the outer fabric right side out. Leave the lining fabric as is. Remember, there will be an opening in the lining fabric.

Insert the outer piece into the lining; right sides should be together. Align the side seams, and match up the raw edges. Pin at the seams first and then pin the rest of the top.

Sew 1/4 inch seam allowance. Once again, use a 2.40 stitch length. If you have the option to remove the front accessory tray, that will expose the free arm. This is super handy if you are sewing anything in the round, like our project here. Another great example is sleeves.

If you are unable to do that, you would just need to readjust your fabric as you did with the small bag.
CREATING A CHANNEL
Through the opening of the lining, gently pull the fabric out. Let's take care of that opening.

Fold each side in 1/4 inch, pinching the fabric together. You can either use the fabric glue here or you can pin. Next, either hand sew or sew the hole shut using your machine. Sew very close to the edge.

Iron the fabric. Push the lining fabric into the outer fabric. Make sure the top is as even as possible. Press for a nice crisp edge.
Lay the bag in front of you. Straighten it as best as you can. Using a ruler, draw a line 1 1/2 inches from the edge. Then draw a line at 2 1/2 inches. Carefully turn it over and mark the other side the same way.

Now, bring it back to the sewing machine and sew all the way around- on both lines. Make sure that you backstitch at the beginning and at the end.

Once you have completed sewing, on the outer side, carefully pick out the stitches of the channel you just created, just between those lines that you just sewed.

MAKE IT A DRAWSTRING BAG
Cut two long pieces of twill tape, each approximately 24 inches long. Using the bodkin or a safety pin, feed the tape through. You want to start on one side, feed it all the way around so that the tape comes out the same side. Leave several inches of slack at the beginning and end. Tie a knot on each side, close to the bag. If you don’t like the look of frayed twill tape, cut a little bit off and then use a product like Fray Check. I have also used regular ribbon or I have even made my own. You can get creative.

CONCLUSION
You have now made adorable drawstring bags. These are great for little gifts. The best part, they are reusable! I hope that you enjoyed this tutorial. Until next time, Happy Sewing, Everybody!


