You're in the mood to sew. You want to get that cute project done that you have been trying to do for some time. You scooch up to your sewing machine, prepped and ready to knock out your project. Next thing you know, you're having all sorts of issues. Your thread keeps nesting or it just snaps. Don't worry, you can fix it! Troubleshooting time!
Prepping Your Machine for Troubleshooting
The first thing that you want to do is unplug your machine, remove your needle, and remove the thread.
Thread
Although you're not going to rethread your machine just yet, make sure that you have good quality thread on standby. Please don't use a bargain bin option as they are very linty and easily snap. If that is what you have been using, do yourself a favor and throw it in the garbage can. Also, make sure that you aren't using a general-purpose thread for, let's say, embroidery. Thread is designed to accommodate the type of sewing that you're doing. Some thread brands that our technician recommends are Isacord, Maderia, and Aurifil.

Needle
Next, let's talk about your needle. If you are having issues and are going through these troubleshooting steps, regardless of whether or not there is low sew time with that specific needle, change it. Also, make sure that you are using the correct needle for the type of project that you are doing. Needles are designed to be used with specific fabrics. If you are using a universal needle, again make sure that you have a new one handy. After doing all the troubleshooting, you will be replacing the needle. If you aren't sure which needle to use, check out this handy-dandy poster!
Needle Plate
Remove your needle plate. Depending on your machine, there may be a needle plate B that partially covers the top of your machine. Other models just have the needle plate. When you remove your needle plate, inspect it for burrs or punctures.

This is a very common reason for thread breakage. The thread catches on the little burr and snags it just enough to snap the thread.
Oftentimes, you can give your needle plate a little more life. To do this, you have to remove the burrs.
Mitchell's abrasive cords and tapes are super handy. They make it easy to get in those small nooks and crannies. You can also use sandpaper or an emery board. Make sure that you get a variety of grits so that you will be able to address large and small burrs alike.

If you have a vise available, that makes it much easier to sand back and forth; otherwise, just take your time and try to hold and sand as best you can.
Only sand a little bit at a time. Accidentally making the opening of your needle plate too large can cause skipped stitches and your fabric will easily get pulled into the machine.

After removing the majority of the burr/s, use a fine sand paper, such as a 200 or 220 grit, to finish and polish the plate.
Bobbin Case
Next, remove the bobbin case. Inspecting the bobbin case is huge when troubleshooting.
With a top-loading bobbin; oftentimes, the bobbin case is inserted into the machine incorrectly. When the needle plate is replaced and you try sewing, the first thing that happens is the needle nicks or punctures the bobbin case.

If it punctures the bobbin case, it's time to get a new one. We can help you with that.
If it just nicks it and puts a little scuff or burr in the bobbin case, most of the time, you can save it and you will be able to continue sewing until you get a replacement.
First, you need to locate the issue. Sometimes, you can clearly see it - other times, not so much. Run your fingernail around and under the bobbin case. It should be smooth. If you feel anything, you will need to take care of it. When fixing the bobbin case, you don't want to use coarse sandpaper or tape. It can take too much off and then your bobbin case will not be savable.
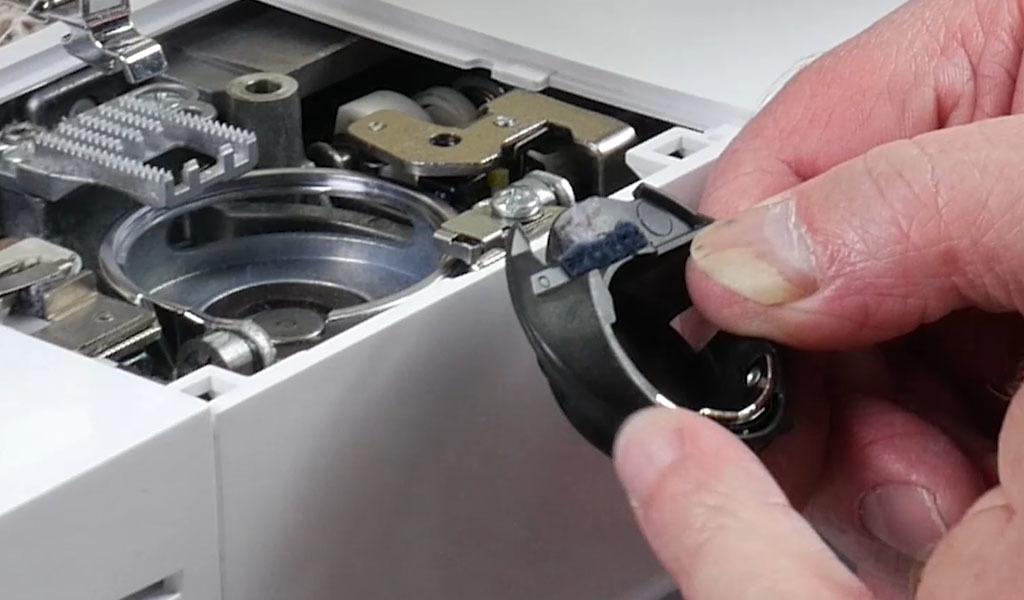
When working on the bobbin case, use fine-grit sandpaper and sand a little at a time, checking after each pass.
Per our technician, you can often fix a top-loading bobbin case; whereas, with a front-loading bobbin case, if it has a burr, it is usually easier to just buy a replacement bobbin case.
Troubleshooting the Shuttle Hook
Let's talk about the hook. This is going to look different depending on your machine, but essentially, it's the piece that your bobbin case fits into. There is a fine point that is necessary when forming the stitch. The tip gets nicks and will have a, you guessed it, burr.
On a front loading machine, the shuttle hook looks like this - almost a little half-moon.

You will also have your Hook Race. This is what the little half moon fits into. Both pieces have tips that need to be checked.
On a top-loading machine, after removing the bobbin case, you can see the shuttle hook or hook race unit. Confusing, I know.
Once again, using your fingernail, feel all around the front and the tip. If your nail catches, you know you have a burr. If you are getting thread nesting, looping, skipped stitches, or breakage, this is often the culprit.

Frequently, tension issues are thought to be what's going on, and sometimes it is; however, many times, it's these little burrs. If these are not addressed and the tension is just adjusted, you are going to run into more problems because your tension will be all wonky, in addition to snagging and snapping thread.
With your sandpaper or an emery board, sand the tip from the front. You don't want to sand from behind the tip as you will start to change the shape and the formation of the stitch will not work properly.
Only take off just enough to remove the burr.
Also, using your finger, feel around the race unit. It should be nice and smooth. It's harder to smooth out nicks or burrs on a top-loading machine, but you can do it if it is a small burr. Take fine-grit sandpaper and hold it over the race unit. Using your handwheel, rotate it towards you. Keep doing this all the way around. After sanding, double-check with your nail/finger to see if it's smooth.
Clean your Machine
After you have removed any burrs, using your lint brush, make sure to clean out your machine. For more information on how to do that, you can watch this helpful video.
Other Troubleshooting Areas
Other parts that are not often thought to be checked are the thread guides. Over time, the thread guides can get little burrs too. As with the other items that you fixed, softly sand them away. If you are unable to do so, check with us. We offer a large variety of thread guides.

If the thread is still getting hung up somewhere, check the plastic housing of the machine, especially near the take-up lever. I little sliver of plastic can be sticking out, wreaking havoc.
Check your bobbin. If there is a little nick, just toss it. They are not fixable. Thankfully, bobbins are inexpensive and readily available.
I like what our technician says, "There could be burrs anywhere along the thread path. Be mindful of where that thread is going and where the thread makes contact." In his 30-plus years of sewing machine repair, he has seen burrs in some less than common spots.
Put your Sewing Machine Back Together
Now it's time to put everything back together. Grab your manual to ensure that everything is put back where it should be.
I do want to take a moment to talk about installing the top loading bobbin case, because, as I stated early, putting this in wrong is what can cause punctures in the bobbin case.

Notice on the front of the bobbin case, there is a little arrow. There is also one on your machine. These two points need to match up. With your pointer and your thumb, hold the bobbin case at a slight angle downwards. Insert it into the machine, making sure that the bobbin case sits on the little ledge of the shuttle hook. There should be little bit of movement, about 1/8" or so. After everything is seated properly and your arrows match up, rotate your handwheel towards you several times and make sure that it can make its rotation with no hiccups. Put the needle plate back on.
Insert your new needle, once again, making sure that you are using the right kind.
Lastly, rethread your machine. Make sure that your presser foot is in up position when you thread your machine. This ensures that the tension disks are open and that the thread will be in the proper spot. Once you reach the needle clamp thread guide, you can lower your presser foot and continue threading your needle.
Conclusion
I hope that these troubleshooting suggestions will allow you to continue sewing your beautiful project.
Just a quick note, it is recommended to bring your machine in for servicing every 6 months to a year; however, this information is perfect for rectifying issues that arise until you get it in to see the 'Sewing Doctor.'
Troubleshooting is fun, right?!
Until next time, Happy Sewing, Everybody!


