Are you ready to learn how to sew vinyl? Then you’ve come to the right place!
Vinyl fabric is very versatile and is ideal for indoor and outdoor sewing projects. You can make everything from patio cushions and pillows to beach bags to raincoats and baby bibs.
”Vinyl” is really just a blanket term for any fabric that has a “plastic” coating. This includes artificial leather (pleather), oilcloth, laminated fabric, Chalkcloth, etc. These fabrics are water-resistant, durable, flexible, and relatively inexpensive.
The trick to sewing vinyl is using the proper tools and adjusting your machine to the proper settings. In this article, we discuss everything from the foot to the needle to the stitch length. Additionally, we feature all these tips and more in our video, Tips For Sewing Vinyl Fabric.
First, let’s talk about the most common types of vinyl you may come across.
PVC: PVC stands for polyvinyl chloride, which is a synthetic plastic polymer. PVC fabric is simply polyester with a layer of polyvinyl chloride. Polyester fabric can be reinforced heavily for industrial projects or be light enough for clothing.
Artificial Leather: These range from resembling animal hides to the latex-look of “Pleather”. It’s much less expensive than buying an authentic animal hide, and for a population of people, more ethical. It’s also water resistant and comes in many styles, textures, and prints. Some bolts will have a cloth backing and others will not.
Oilcloth: This super slick material often comes in fun, brightly colored patterns. It’s waterproof, durable, and very flexible. It’s for kids crafts and is low maintenance. Traditionally, Oilcloth was duck cloth coated with boiled Linseed oil to give it a waxy, waterproof topping. Now, it simply a cotton mesh coated with a thick layer of PVC.
Laminated Fabric: Laminated fabric is usually a high-quality cotton coated with a light layer of polyurethane film. It’s thin, flexible, and drapes well. It’s ideal for projects you want to have water-resistant properties but also remains lightweight and flexible with a pleasing drape.
Chalk Cloth: Slightly heavier than Oilcloth, Chalkcloth is wonderful for craft projects. Just like a chalkboard, you can draw all over this fabric with regular chalk. It’s great for reusable signs, tags, placemats, and home decor.
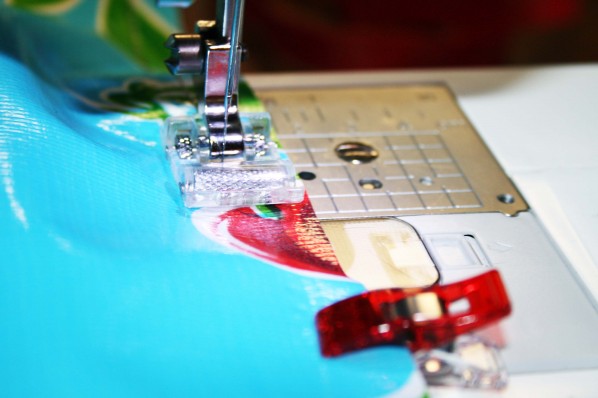
The Foot: Walking Foot -or- Roller Foot – or- Non-Stick Foot
The surface of vinyl is sticky and slippery at the same time. It’s notoriously difficult to feed with a standard General Purpose Foot. A Walking Foot will help pull the fabric through at the same rate as your feed dogs. The Roller Foot and Non-Stick foot are also fantastic tools for feeding Vinyl, as well as many other fabrics.
The Needle: Leather 90/14 or Universal 100/16
You can normally find these in Universal, “Leather“, or “Denim“. You can even use Jean Twin Needles for perfect parallel stitching. If you find a Leather or Denim Needle that’s a size 90/14, you’re in the clear. It’s all about the needle design.
The Thread: Quality All Purpose, Heavy Duty, or Industrial Thread
If you don’t expect to be constantly tugging at the seams, general purpose thread works well. However, if the vinyl you’re using has a fair bit of weight and you expect your seams will experience stress, use Heavy Duty Thread or Industrial Thread instead. It’s often beneficial to pull the needle thread to the back and manually tie your knots.
The Pins: None.
Using pins will cause permanent holes which compromise the strength of the fabric. And any hole can easily tear into bigger holes. Wonder Clips are great.
Stitch Length: 3.0 mm or greater.
Anything less than a 3.0 stitch length causes the seam to perforate (think of when you tear paper out of a notebook). It really compromises the strength of the seam. As far as width, try to keep it wider than 2.5 mm.
Pressing: No iron.
An iron will instantly melt the fabric. Instead, finger press the seams or tap the seams with a rubber mallet. If you have some serious creases, try leaving it out in the sun or somewhere warm. You can even utilize steam from a shower. You can add weight (like a heavy textbook) to flatten out creased or set seams, as well.
Did you find this information helpful? Share with your friends or download the Quick Reference Fabric Card for your own use!
84 comments
Thank you for this information. Just what l needed to know as today l am using faux leather and vinyl for the first time . Very helpful. GOD bless you Abundantly
Thank you.
Great information, thanks for everything I needed in the article
Hi I am looking to repair a vinyl patio roof at the seam. What size needle and thread would I use? Should I also use something on the bottom side to reinforce it so it does not rip again?
Please contact us at our Customer Service department so that we can get more information from you, such as the make and model of your machine. Once we have this information, we can access a manual and find this information for you.
What a wonderful site – I have been re adding all the questions and answers. I have a Juki 8700 straight stitch only commercial machine – I am just learning how to use it. I purchased it as I had been making totes out of empty animal poly feed bags. My question is pertaining to thread. I have two big spools (and I mean big) that came when the machine came – I ordered them special but it breaks – I should say shreds as I think the poly weave cuts it as it goes thru – do you have a suggestion as to what type of thread I might try. On my kind of fancier machine also a Juki I used machine size thread and that worked wonderful however on the big machine the little spools kind of jump around on the thread tree rack. I have a bunch of bags prepped to sew and kind of overworked my fancy machine and that is why I ordered the Juki. Any information about thread would be greatly appreciated. Thanking you in advance. Gerry
Hello! This article was very useful! I tried to sew a zipper pouch made out of plastic (The thinnest) and a couple of very thin fabrics (the interfacing and the fabric), a needle 90/14 and the stitches below were loose only at the final stitch. The presser foot I used was the standard and the stitch length was 4. I have a simple singer 3116. What do you think could have gone wrong?
Please message us at [email protected] and we would be able to provide some assistance with this! Thank you!
This article is actually a nice one it helps new web visitors, who are wishing in favor of blogging.
Hello,
I am wanting to try and re-upholster our tractor seat. Its a heavy vinyl. I have a cheap sewing machine. Do you think if I use all the tips you have given that my cheap sewing machine could do this project? Or would I need to buy a good sewing machine?
Thank you
MJ
I would not suggest doing that task on a simple or cheap machine. I would suggest using a machine that is designed for that type of application. I hope this helps!
I’ve enjoyed reading the post. It is very supportive and useful post. I would like to visit the post once more its valuable content. Thanks for sharing this so interesting post! I really want to be thankful for the way you have put it here.
This is exceptionally helpful. I have just been asked to help recover some portions of boat cushions and accoutrements and this was a great place to start. The comments section also contained insight into sewing vinyl that is invaluable. Thank you for making this easy to understand and straightforward. Much appreciated.
I’m trying to find out what thread I should be using in my bobbin when using heavy duty thread. Some say only put it in the bobbin others say use for top tread and regular thread in the bobbin. I am wanting my stitching to show up better when I sew vinyl straps. What would you suggest.
Hi Judith!
To avoid thread nesting, it is generally recommended to use a lighter thread in the bobbin if you can. If you need to use a heavier thread, you will need to adjust the tension on your bobbin case. This will just take some tweaking and testing on scrap fabric. Many people like to have a second bobbin case that is set to the appropriate tension for when they use heavier thread. That way, you won’t have to go through the hassle every time. In addition, just follow the suggested steps in this blog and you should have beautiful top-stitching on your vinyl straps in no time!
Hey I am trying to sew blind tufts in a sofa cushion. The material is a contract grade vinyl. In case you are unaware of the specifics, it means I am sewing a loop of scrap fabric on the back face of the vinyl which will then be pulled in tension via tufting string to another loop which is sewn, similarly, to the other side of the cushion. Because this is for a brand new cushion, it means that the string will be held in considerable tension (brand new cushion, the seat foam is very puffy and firm initially). When I pull the tufting string after completing the sewing, I keep tearing the stitches through.
Do you think that this is an issue related to the spacing or something else?
Hi Barry! I recommend clicking on the links below and reading the articles regarding Blind Tufting. This might help troubleshoot the problem for you. I hope this helps!
https://www.woodworkingnetwork.com/magazine/fdmc-magazine/blind-tufting-loose-seat-cushion
https://homesteady.com/how-5016168-make-tufts-upholstery.html
How fast do you run through needles? I’m working with Whisper Vinyl and leather needles at 90/14. The first seam I run will look great and the next seam with slip stitches as though the needle is dull.
It does sound a little fast to go through a needle. A stronger needle might work better for you I would try a size 16 in this case
Hi, Sarah. I’m making boat seat cushions and using marine vinyl material and SOL2000 thread (it’s very heavy duty and resistant to UV). The thread keeps breaking in my machine, do I need larger needles?
Hi! Usually, if the thread is breaking it’s because the tension is too high or the thread is too old. I would first try to reduce your thread tension, then move up to larger needle size.
I can’t thank you enough on the tips for sewing vinyl, leather, etc. The walking foot worked perfectly. I’ve had it just wasn’t sure where or how to use it. Now I do and will be making much use of it. Thanks!! By the way, do you have any tutorials on sewing quilts? Thats my next project.
I can’t thank you enough on the tips for sewing vinyl, leather, etc. The walking foot worked perfectly. I’ve had it just wasn’t sure where or how to use it. Now I do and will be making much use of it. Thanks!! By the way, do you have any titorials on sewing quilts? Thats my next project.
Hi! We have various videos talking about different quilting tools and projects. Most of our quilt tutorials are sewn using quilting panels. This is a recent one: https://www.sewingpartsonline.com/blog/fantasy-forest-quilt-tutorial/
I need to rehem curtains that are latex backed fabric. What is best way to do this?
Thanks
Hi! The best option would be to use a Walking Foot and Wonder Clips. A 90/14 Sharp Needle would work well.
What kind of thread are you using in the bobbin? I’m sewing leather and can’t find the information anywhere. I put upholstery thread in the bobbin too, but that’s not working.
Hi! I match the thread I’m using in my needle. For the upholstery thread – did you loosen the bobbin tension?
Thank you for the hints. I just made a doll cover for American Girl Doll similiar to Dolly Dustless cover that I have had for years. Used medium wt clear vinyl and also some white binding. I used roller foot, size 16 denim needle, Poly all purpose thread, changed pressure dial to 2 from normal 3 on my Janome machine. Used my wonder clips also. Used stitch length 5. I left my thread tension on Auto as all was fine on a couple of test scraps. I did cover my machine area to the left of the plate with some tissue so the vinyl would slide better. Also put down some plain paper on my machine table to allow the project to slice. Used slow speed. I think the hardest part of sewing with clear vinyl for me was to much light and had a glare. I am 73, retired so was not in a hurry.
Hi, Mimi! Thank you so much for sharing your process and settings! I love the tissue paper trick – very clever!
If sewing snack bags for recycling projects, like tote bags, these needle and stitch sizes wotrk.
Hi, Tutu! Yes, these settings will work.
Thanks Sarah, you are great teacher.
Thank you so much for your kind words!
Strictly speaking, PVC is a specific type of vinyl. Vinyl is a group of carbon and hydrogen atoms of the form CH2-CH. PVC is a chain of vinyl groups with chlorine of the form (CH2-CHCl)n. The terms are not interchangeable.
Thank you for clarifying! Much appreciated!
Very useful information thank you. New to sewing but I’m making some new seating for my boat. Used all your tips from this site to set up at first. Made all the pipng etc to start then made my first seat. Looking really good to my suprize. So a big thank you again.
That sounds like a big accomplishment! So glad we were able to be part of the process!
I don’t know if you’ll get this because it’s been a long time. My machine only does a 3/16 length. Will that work for boat seats?
Yup, you’re machine can do it. You don’t have to use the max stitch length – you would be fine with a 3.5 mm length.
Hi, , I enjoy your emails/posts. I was wondering though if you wouldn’t mind adding the recommended needle sizes for various projects to your downloadable reference cards?
Hi! We have a flowchart that shows the recommended needle size here: https://www.sewingpartsonline.com/blog/finding-perfect-sewing-machine-needle-infographic/
Hi!
Some great tips here, but I’m also wondering how you could make the edge of a circular vinyl piece lay and stay flat, once the piece has been turned right side out?? The vinyl and pvc can’t seem (ha-ha) to keep the circular shape, always creating short straight edges.
I’ve tried a few things, but any suggestions are greatly appreciated!
Thanks so much!
Hello Casey
Sewing curves can be very tricky! I found a article that has a lot of great tips and pictures that should help you sew a smooth curve. They’re using cotton in the article but the same techniques should apply (minus the ironing bit because you’re using vinyl). Here you go: https://www.sew4home.com/tips-resources/sewing-tips-tricks/sewing-smooth-curves-every-time
Awesome read! Really helped for my newest sewing project
[…] Sewing Parts Online […]
Great info, I needed it. I only do hand stitching and I am attempting to repair a vinyl “VersaFit log” that is weighted and used for working out. The tear is at the load bearing handle, so I hope I can fix it without a machine. Perhaps patches are needed after the repair to reinforce?
A patch would probably be a good idea to provide some extra stability.
This was wonderful information. Thank you very much.
thank you for the info. we have a signage company and i have to sew banners. i have a industrial machine. This information is going to be a great help
[…] when sewing and a denim universal needle so it could puncture through the fabric. This post by Sewing Parts Online was so […]
Thanks to everyone I have the info I need to make a large vinyl “window/door” for a grandchild’s stuffed animal bean bag. This is a neat storage for stuffed animals & she can pèek in or swap out her favs & use the bean bag as a seat.
Outdoor fabric was too costly, so I got the idea to make the awning using polyester shower curtain liners. I found some white ones online that were 72″ x 96″ and bought two, so the fabric cost was less than $23.00. I tweaked the design a bit, cut it out (the right size this time) and sewed it together yesterday. MUCH easier to sew and it should repel rain… after all, what is rain but a big outdoor shower! After I put it out there, I will take a picture and attempt to post it on your facebook site.
What a clever idea!!! I can’t wait to see it!
Well, PHOOEY. The vinyl is simply too thin.. Even adding fabric strips at the seams didn’t stop a few other places from pulling apart. My design was not stable enough, either.. The awning sagged too much. I did get some of that McNett seam sealer and applied it but, since I won’t be using the vinyl awning, I don’t know if the seam sealer would have worked or not. I will have to tweak my design and make it with outdoor fabric instead. Back to the drawing board and sewing machine!!!!!
Oh no! I’m so sorry it didn’t work. But good for you for getting back at it! You will make it work!
I finished sewing the awning and did a dry run last Saturday only to discover that the front to back length was about 3″ too short. AAARRRRGGGGHHHhhh! After taking it down, I discovered one seam had ripped open a few inches (from the stress of not fitting right), even though I had reinforced it. Instead of adding more vinyl, I decided to add a piece of outdoor fabric (which is what I used for the reinforcing strips) at the top to increase the depth of the awning and make the pipe sleeve more flexible because I discovered that the vinyl had developed pinholes at the crinkles from inserting the pipe thru the top sleeve. So all is repaired and I am waiting for a warmer and less windy day to try putting it up again. Sounds like a good idea to seal the seams. Can you tell me the name of the sealant and if it would plug up any small pin holes that developed from the crinkles while sewing? I also need some ideas as to how to repair the ripped seam. I would like to show you a picture when it is all finished and up. How do I post a photo?
Hi again! I’m sorry you encounter some problem, but I suppose that’s why sewing is an adventure! I did some research and have heard great things about McNeet Outdoor Seamgrip.
I just found out we can’t post photos in comments, but if you get a chance, would you send me a photo to my email ([email protected]) – I LOVE outdoor sewing projects and would love to see what you did!
Good luck! Stay positive!
Correction: My machine goes to 6 stitches per inch so that is what I am using. The house is cold so the vinyl is really stiff and the size is bulky to work with, but it is going together fairly well. I anticipate being done with it today, but I won’t be able to put it up until we have a warm day again.
The bulk is definitely hard to work with. I made a vinyl grill cover and the hardest part was supporting all the weight of the fabric while I sewed.
I am making a vinyl “roof” to provide some shade and a bit of rain protection for a small deck (approx. 8×6 feet). The vinyl is fairly lightweight, but I plan to support it well by adding sleeves for PVC pipes to reduce sagging or ponding from rainwater. I will be using polyester thread rated “Outdoor”. I have a Singer sewing machine and the stitches are “per inch”. I do not know how to compare this to a stitch length of “3”, but the longest stitch I can sew is about 8 per inch. After reading about the hanging weight of the shower curtain, I think I might also need to add strips of outdoor-type fabric to the seams just to be on the safe side. I hope one fabric strip per seam will be enough. I plan to sew the seams 1″ in from the edge of the vinyl. I hope this all sounds reasonable. Wish me luck!
It sounds like a GREAT idea! Love the idea of using PVC pipes for support! You definitely want to stabilizer those seams with outdoor fabric. When its all finish, you can even use outdoor sealant (found at home depot/Lowes) to really protect those stitches. I’d love to see a picture when you finished – Good Luck!
This is a helpful site. II am going to repair a jucuzzi topper. I make alterations and seamstress for people. Now and then I get a request for a repair I am not to sure of. How do II set up heavy thread in my bobbin? What do II do to the tension and presser foot pressure settings?
Hi June! To use heavy thread in your bobbin, you’ll need to loosen the bobbin tension screw, which is located on the bobbin holder. Your presser foot pressure adjustment depends on the thickness of the material you are sewing. If you are sewing thick material (I’m assuming you are given the heavy thread), then you want to reduce your presser foot pressure dial.
I hope that helps. Please let me know if I can help with anything else. Good Luck!
Thanks for the tips. I am attempting to make a clear vinyl curtan panel, although I’m worried about the hanging weight. Any advice you can give would be appreciated. Thanks.
Wow – that sounds awesome! If you get a chance, I’d love to see a picture of the finished project!
Because of the extra weight, I would definitely stabilize the seam with a strip of muslin. Are you inserting grommets or making a tunnel for the curtain rod?
Thanks for the info. I make bibs for my grand daughter out of what I think is oil cloth. I will try walling for and bigger stitch.
Thanks so much I am attemping to make a clear vinyl purse/backpack wish me luck.
This was very helpful. I knew I needed to enlarge my stitches but was not sure by how much so this was great info. also was told I could use regular poly thread but will purchase a heavier one now as my project will have lots of stress on the seams. I am attempting to make a football tackling dummy for a 9 year old grandson. Thank you so much for your wisdom.
I’m so glad we were able to help! And good luck with the football tackling dummy – that sounds AWESOME! We would love to see a picture when you are finished – first time I’ve ever heard of a homemade version!
How do get leather to glide across sewing plate? I find that it sticks
With some good old fashion scotch tape. Cover the plate with some scotch tape and the leather will slide right over it.
Wow! I was already in awe of the helpfulness of your article, and now this tape trick for leather. thank you!!!
I am looking for a company/contractor that can sew spandex to Teflon or vice versa.
Any ideas where I should begin my search?
thank you
Hi! You should check out your local sewing supply/fabric store. The cutting counter usually has a list of seamstresses for contract sewing work.
Good informative website. Sarah is very competent and complete.
Hi Ms. Brenda! Thank you so much for your kind words!
I just recently bought some “faux leather” to make a purse. This was the kind of information I was in need of before I started. Thanks so much!
Glad we could help – and good luck with the purse! Are you using a pattern or drafting your own?
Thank you! This is exactly what I was looking for.
You’re welcome! Glad the information was helpful!
Perfect! Just what I was looking for. Thank you!
Glad to help! Thanks for stopping by!
Thank you so much for the information I needed, such as, needle size and stitch length which most sites don’t mention. Very helpful! Blessings, JL